ラベル howto の投稿を表示しています。 すべての投稿を表示

2012/05/07

オルタード単語カード(カードリングとじ)

This is a fun project for yourself or someone else.  Get a word ring pad from the hundred yen store or dollar store.  This word ring pad came in a pack of two.
100ショップで売っている単語カード(カードリングとじ)を使いました。二つで100円。

Remove the cover from the ring and cover with adhesive.  You can use any kind you like.
カバーをとって、あなたの好みの接着剤を塗ります。

Stick the cover onto a paper of your choice.  Don't worry if it's not completely lined up.
カバーを好みの紙にくっつけます。完璧に貼らなくてもいいです。

Take your craft scissors and cut along the edge of the pad removing the excess paper.  
クラフトはさみで紙の端を沿って切ります。

Punch the hole out.  Remember to do this before you cover both sides!
道具で穴を開けます。両面に用紙を貼る前に穴を開けないと穴の場所を分からなくなります。

I'm using leftover pieces of paper to finish off my cover.  These craft scissors by Kuretake are my favourite.  I use them a lot!  
この写真では私が残っている紙をギザギザクラフトはさみで切ってます。呉竹のクラフトはさみの中このはさみは私の一番使っています。

Before I stick down my letters, I use a clear ruler to line them up.  I can also adjust my letters to fit my cover.  
文字シールをおくまえに、透明定規を並べて位置をチェックします。場所の長さに合わせられるのでとても便利です。

You can see how close together my letters are place in this picture.  I wanted them all on the flower patterned paper.  Then I took a copic multiliner pen and handwrote "sketch" above the alphas. 
全部の文字が花模様の用紙に載せるため、 近くくつけないと置けなかったです。上にコッピクペンで「スケッチ」を書きました。

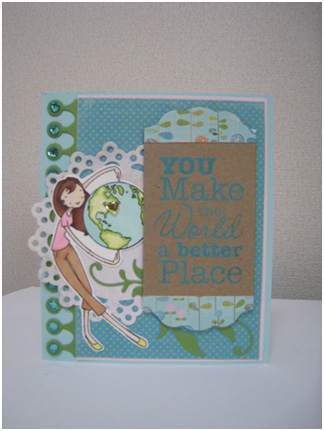
Here is my finished ring pad.  I added a leftover star and a bling, stickles to the letters, and tied ribbon to the ring.  
リボンをリングに結んで、エンベッリシュメントを付けて、これで終わりです。

Now I have my book to draw sketches for cards and more!  
私はカードのスケッチなど書く時、これは便利です。


Happy Crafting!  


2012/04/10

カードベースの作り方


How to Make a Card Base

These are the simple steps for a regular A2-sized card (final measurements:  4 1/4 x 5 1/2’’) using an A4-sized paper (8.5x11’’). 
この簡単なステップはA4-サイズペーパーを使ってA2-サイズカードを作る事が出来ます(完成カードは4 1/4 x 5 1/2)

You need:  a piece of 8.5 x 11’’ medium-heavyweight sheet of paper, a paper trimmer, a scoreboard, and a bone folder.  *Any paper thicker than regular paper is fine.  
必要な物:8.5x11インチ紙(厚紙)、ペーパートリマ―、スコア―ボード、ボーンフォルダー

Steps:  Cut paper in half, fold in half, and score with bone folder… Voila!
ステップ:紙を半分に切り、半分に折って、ボーンフォルダーで線つけて、角を曲げます。

But here are step-by-step instructions with pictures or check out my video at
ここはステップ・バイ・ステップの説明(写真付き)、またはYouTubeビデオを是非見てください。


1.     Take an 8.5 x 11’’ sheet of paper.  Slide it lengthways under the paper trimmer arm.
A4サイズ紙をとって、トリマーのアームの下に入ります。


2.     Once you’ve measured 5 1/2 inches on the left side, cut the paper.  (Essentially you are cutting the paper in half.) 左側に5.5インチ測ったら、紙を半分に切ります。


3.    Next place the cut piece of paper on your scoreboard.  I use a Martha Stewart scoreboard and love it.  切った一枚をスコアボードに載せます。


Using your bone folder, hold your paper firmly down while scoring your paper at 4 1/4 inches. Score means to make a line for easy-folding later.  You want to do it gently so as to not tear your paper.  Go slowly so your bone folder doesn’t jump out of the groove.  
ボーンフォルダーで4.25インチ測って折り目を付けます。


4.    Next, fold your paper in half so the edges meet. Use your bone folder to crease the paper and make a crisp fold.  Try to hold the card open edges together while creasing the paper. 二つ折りにして端を合わせます。


There you have a finished card.  カードベースが出来ました。


Note:  If you card isn’t perfectly lined up you can trim the edges to make it straight.  完全に側面があってないなら、トリマーでまっすぐ切って下さい   

Try to make cards other ways using different sizes.  Have fun and remember the sky’s the limit!
違うカードサイズを使って見て楽しんでください。
The sky‘s the limitだと「無制限」の意味です。

スタンプとインクとエンボスのやり方

Stamps, Inks & Embossing


When I first started scrapbooking, I was all about paper…until I learned all about stamping.  Let me just say first that I know how confusing it can be in the beginning.  Hopefully this will help explain a few things.  (^_^)v
スクラップブッキングを始めた時、スタンプのことを知るまではただ紙に夢中になってました。最初はすごく難しいと思います。ここは少し分かりやすく話します

There are different types of stamps, a ton of inks, and many stamping techniques.  Just remember – all you really need is a stamp you love, a pad of ink, and a base to stamp on.  You’ll enjoy it every time!
さまざまなスタンプやインクやテクニックがあります。ただ一つ覚えておいてください。必要なものはたった一個の好きなスタンプとインクです。それがあれば、毎回楽しい時間を過ごせます!

First, we’ll talk about stamps.  There are rubber stamps and clear stamps (polymer or acrylic based).  Rubber stamps can give a great image, but give you less visibility in seeing what you are stamping.  Clear stamps allow you to see exactly where are stamping. 
スタンプは二つのグループに分けましょう。ラバースタンプ(ゴム印)とクリアスタンプ(透明印)。ラバースタンプだったら、あまり位置がわかりにくいですが、すごく細かい画像が出来ます。


Wood-mounted rubber stamps come with and without foam.  If they have the foam it will allow you to stamp nice because of the cushion.  Otherwise you may need something under you base (a stamping pad, if you have it).  If it’s on a block you will have to guess where you are stamping. 
ウッドブロックのラバースタンプはフォーム有り無しの両方があります。スタンプする時、下にクッションがあればきれいに写せます。ブロックはイメージより大きいので、どこにスタンプするか完全にみえません。


Cling-mounted rubber stamps come with a foam layer between the rubber and a cling surface that will attach to a clear stamping block.  You still can’t see exactly where you are stamping, but because the image outline is cut out, you have a more accurate idea where the stamp is going. 
クリングマウントスタンプはラバーもフォームも一緒、ウッドブロックじゃなくくっつきやすい面がついてます。ウッドブロックより見やすいので、アクリルブロックにつけると使いやすいです。


Clear stamps (made from polymer or commonly known as acrylic) are great because you can see exactly where you are stamping.  They are relatively easy to clean depending on the ink. 
クリアスタンプ(ポリマーかアクリル製)は透明なので、ぴったり押したい場所にスタンプが出来ます。インクによって、掃除もやりやすいです。


Stamping blocks come in all different shapes and sizes.  Pick the one that is closest in size to your stamp for efficiency when stamping. 
スタンプブロックは多くの形やサイズがあります。スタンプに一番近いサイズを選んで、簡単にスタンプ出来ます。


With all stamps, you may stain them with the ink.  If you clean the stamps soon after you use them, it’s less likely to happen.  I use non-alcohol baby wipes, just to be safe.  But some inks like Staz-on should be removed with a stamp cleaner (Staz On has a remover of their own). 
インクを使うと、汚れや着色される可能性があります。クリーナーで早めに拭けば、大丈夫です。私はノンアルコールのウエットティシュを使っています。例えばStazOn製を使えば便利です。


Steps for Stamping: スタンプのやり方:

1.  Choose your stamp.  If it is a clear stamp, attach it to an acrylic block. 
スタンプを選んで、クリアスタンプの場合はブロックに付けます。

2.  Ink the stamp by pressing it firmly on the pad.  Ensure the entire stamp surface is covered.  (For bigger stamps, lay the stamp down faced up and touch your pad to the stamp.) 強くインクパッドに押して。インクがしっかりついているかチェックしてください。


3.If you are using the stamp for the first time or an ink for the first time (or just to be safe) do a test-run to check.  If your stamp has good ink coverage, you’re ready.  If not, re-ink and test until ready. 新しいスタンプやインクは念のため、使用する前にテストしてください。


4.  Press gently, but firmly on the area you are stamping.  Rub over the entire back of the stamp without moving it.  Very carefully lift the stamp directly up to avoid any smudging. (If necessary, retouch if you are using a clear stamp.)    ゆっくり強くスタンプを押します。動かさずにまっすぐ上にあげます。(クリアスタンプの場合はもう一度やり直しできます。)


*Remember, different stamps and inks provide a new look – so have fun experimenting.  いろんな色のインクを使って試してみて下さい。 

Inks インク
Here are some commonly used inks: これはよく使用されるインクです。


Tim Holtz Distress Ink is good for aging your projects and giving them a worn look.  They are water-based and can be spritzed with water to get them to blend, spread and just give a different look. 
ティム・ホルツのディストレスインクは紙をわざと古く見せたり、汚したり、ビンテージ風にしたりするときに使用します。水性インクなので水をかけるとほどよくにじませる事ができます
Memento Ink is a fade-resistant ink.  It should be used when colouring images with markers etc. because it will not bleed. メメントインクは耐光性・耐水性の水性インクです。早く乾かしたい時やコピックマーカーを使うときはメメントインクをお勧めします。 
Staz-On ink is a fast-drying, all-surface ink.  It takes well to rubber stamps, but will not work well with some acrylic stamps.  It is a solvent ink, which makes the stamp harder to clean.  You need to use a stamp cleaner.  It also comes in Opaque which stamps a solid colour, like cotton white.
ステイズオンインクまたはステイズオンオペークは吸収しない物でほとんど素材に使えるオールマウントと言うインクです。使用後、必ず早くスタンプクリーナーで拭いてください。
Brilliance ink is pigment-based and gives a vivid image when stamped.  Because it is pigment-based, it will easily smudge so take extra care.
ブリリアンスインクはパール顔料系インク。乾燥時間はちょっとかかるので、にじむのを注意してください。
VersaMark is a watermark stamp pad.  When stamped with Versamark, the image will be translucent and is great for background designs.  It can also be used as an embossing ink or as a primer to new stamps before stamping in another ink, ensure even coverage.
バーサマークは無色透明なインクです。スタンプした部分の紙の色が濃くなりダブルトーンになります。 エンボスのテクニックも使えます。乾燥時間はちょっとかかります。
VersaMagic is also pigment-based, but is a chalk ink.  It requires a little drying time so be careful not to smudge. 
バーサマッジックは不透明なチョークの顔料系インク。ゆっくり乾きます。
Embossing Ink, when stamped, leaves a clear image.  Then pour embossing powder on top of the image and shake off the excess powder (put back in the bottle for next time).  The powder should now be heated with a heat tool to cook it or melt it to get a professional look.  Embossing provides a nice texture to any project.
エンボスインクを使ったら、無色透明な画像が出来ます。その上に、エンボスパウダーをかけてヒートガンで溶かします。買った製品みたいに、きれいな作品が自宅でできるので楽しいです。  
The Essential Glue Pad is not an ink, but an adhesive for glitter or flock.  Simply stamp on the pad and then onto the paper.  Add glitter or flock.  Leave until dry and remove the excess (putting back into the bottle).
インクではないですが、エッセンシャル・グル―パッドはインクパッドの形のようにラメやフロックパウダーと使用します。普通にパッドに押して、スタンプしてラメやフロックを振りかけます。グル―を乾かしてその後、余ったパウダーをボトルに戻します。

Tips: インクのコツ: 
l  Store ink upside-down so the ink is at the top of the pad and ready for stamping.  Your ink will go a lot farther. インクをさかさまにしておいておくと、長く使えるように出来ます。
l  Use make-up sponge and a butterfly clip for inking and distressing.  It’s cheap and easy to use. クリップをメイクのスポンジに付けて使うと、ディストレスする時に安あがりで使いやすくなります
Always do a test before stamping or inking on a project – it’ll save you from making a mistake you’ll regret.  作品に使う前に常にテストして、失敗や後悔を避けましょう。


Steps for Embossing with a Heat Tool: 
ヒートツールでエンボスのやり方:


1.Stamp on a watermark or embossing pad.  Ensure good coverage. エンボスパッドでスタンプをきちんと押して。


2.Stamp gently onto your area to be embossed.  Be careful not to move the stamp, as it might be slippery with embossing ink. エンボスインクを付けたら、滑りやすいのでゆっくりスタンプしてください。


3.    Pour embossing powder over the area to be embossed.  More is better!  You can put the extra back into the container later. エンボスポウダーを前面に振りかけて。いっぱいかけたら、後でまた戻せます。


4.    Pour off the excess powder.  Tap the back to remove any remaining powder.  (You can also use a small paintbrush to take off an excess.) 裏面に指でタップして。余ったパウダーを落とします。(絵の具のブラシを使ってもかまいません。)


5.    Using an embossing tool, heat the image.  You can see the powder start to melt and change texture (it might take a minute for the heat tool to warm up first).  Don’t heat in the same place too long or it will burn. ヒートガンをかけます。パウダーは溶けるので同じ場所に長く当てると、焦げるので気をつけましょう。


Here’s the finished embossed image:


ダイカッティングのやり方

Die-cutting

If you’re not a scrapbooker or are a newbie to the craft, a question you will ask is what is die-cutting.  I had no idea until I saw a YouTube video showing me exactly what it was, how to do it, and the tools necessary.  I’ll make it simple for you…
初心者またはスクラップブッキングをしない方なら、「ダイカッティングって何ですか」と聞くでしょう。私もYouTubeの動画を見る前は、やり方、必要な道具などはまったく分かりませんでした。ここでは簡単な説明をします。


Here is my die-cutting machine.  I use a Big Shot, which is a product made by Sizzix. 私の型抜きの機械はシジックスのスビッグショットです

My friend, also named Cheri (different spelling than me), uses a Cuttlebug.  My mom uses a Tim Holtz Vagabond, also a Sizzix product.  But they all do the same thing – cut paper using dies.
私の友達(名前もシェリー、でもスペルは違う)はCuttlebugを使っています。私のお母さんはティム・ホルツのバガボンド(Sizzixの製品)を使っています。これらすべて、形や文字を切り抜くことが出来ます。

What are dies?  Dies are like cookie cutters for scrapbooking.  They are made of steel and have an edge that can cut paper, material, or chipboard, depending on the quality of the die. 
ダイって何でしょう?ダイはスクラップブッキングのクッキー用のカッター見たいな物です。ペーパーや布やチップボードなど切ることが出来ます。ただダイよって異なります。


Sizzix makes thick dies that will cut a lot of things.  They also create Tim Holtz dies, which are thick and thin (rosette die, for example). Thin steel-made dies are very popular because they take up less space than bulky dies and are friendly on your wallet.  Spellbinders make very convenient Nestabilities dies – one shape in many sizes that fit or ‘nest’ inside each other. My Favourite Things and PTI makes many cool dies that come in a variety of shapes.  
シジックスが厚くても薄くても切れるダイを製造しています。ティム・ホルツ製のダイもあります場所あまり取らなくて財布にやさしいので、薄いダイは大人気です。Spellbinders製は手軽なNestabilitiesでいろいろなサイズの異なるいろんな形のダイです。MyFavouriteThingsもPaperTreyInkも可愛い型抜きダイがさまざまあります。


The important thing about cutting in any machine is the sandwich technique.  You need layers to make the thickness full enough so the die can bite into your paper or material you are cutting. 
ダイカッティングのやり方で一番大切な事はサンドイッチのテクニックです。
レーヤーを入れて厚さがあえばダイで切る事が出来ます。


Going into the Machine


Coming out of the machine


The die-cut piece


Examples with Big Shot: 
              For thicker dies, like Sizzix – 厚いダイ(例えシジックス)
Acrylic Plate
Sizzix Die
Paper, Etc.
Acrylic Plate


For thin dies like Spellbinders, MFT, PTI – 
薄いダイ(SpellbindersやMFTやPTI)―
Acrylic Plate
Die
Paper
Acrylic Plate
Multi-Purpose Platform


2012/03/06

接着剤

Adhesives


Depending on what you are doing, you will probably need a variety of adhesives for different things. From left to right, you see a tape runner, liquid glue, a glue pen, foam dimensionals, and double-sided tape. These are the most common adhesives.

何を作るかによって、いろんな接着剤が必要です。左から順に、一番使う接着剤はテープのり、液体のり、ペンのり、3Dフォーム、と両面テープ。


Tape runners are the most effective way to adhere paper and photos to your work. They are easy to use and, in most cases, easily removable.
テープのりは一番手軽に貼る方法です。簡単にはがせるタイプもあります。

Liquid glue is best used to adhere things securely. Once it dries, it won’t move.
液体のりはしっかり貼れます。乾いたら、動かせません。

A glue pen is best used when adhering intricate pieces. Be sure to hold it in place with gluing and not to put too much glue or the excess glue will spread out from under the piece. 
ペンのりは小さい物や細かい物を貼るのに便利な接着剤。貼る時は乾くまでしっかり押さえるのがポイント。あまり多く付けて広がらないように気をつけて。

Foam dimensionals are used to pop up a project and make it stand out from the rest of the piece.
3Dフォームは写真や細かいパーツを立体的にデコレーションできます。

Double-sided tape is good for adhering things like ribbon or envelopes or things that should be firmly attached.
両面テープはリボンや封筒や物をしっかり接着できます。


I have a hot glue gun, which is great for attaching dimensional flowers and pieces of embellishment to you projects. Some people are afraid to use hot glue, but I find it works quite well for certain things. My first gun was 315 yen from Daiso. My new gun has a precision tip and was just over 10 dollars at Hobby Lobby in the US.

私はグル―ガンを持ってます。立体的な花やエンベッリなどの貼りにくいものはホットメルト接着剤で貼りやすくなります。グル―ガンは難しいと思わず、すごく便利で安心して使えます。最初に買ったグル―ガンはDAISOから315円でした。今使っているガンはだいたい10ドルでアメリカから買って来ました。


Below is a picture of my 1.5 '' Xyron sticker machine and my Scotch ATG (Advanced Tape Runner).
下の写真は1.5’’ザイロン・シールメーカーとスコッチのATGガン。


The Xyron allows me to cut out any piece and run it through the machine to create a sticker. The entire back will be covered with adhesive, ensuring the piece will not fall off.
ザイロンは何でも小さく切ったものを通してシールが作れます。後ろは全面に接着剤をつけて、しっかりはがせないように貼れます。

My ATG gun is great, especially for doing larger projects. The tape roll comes in 36 yards (or 32.9 metres). If my small tape runner is out of tape, which it often is, I’ll grab for this. 私のATGガンは特に大きい作品を作る時に最高です。テープ一本は36ヤード(32.9メートル)。小さいテープのりはすぐになくなるのでATGに切り替えます。

Which brings me to my final point...always have spare adhesive on hand, you’ll never know when you’ll run out! 
最後のポイントは、必ず詰め替えを買っておいて。ぜったい急に切れちゃうから。

やり直しとペーパーピースのこと

Retouching and Paper Piecing
やり直しとペーパーピースのこと


I wanted to make a card for my mom for her birthday. I chose to make her a non-traditional birthday card with a big message.
お母さんのために誕生日カードを作りました。普通のハッピーバースデーじゃなく、もっと感動的なメッセージを伝えたかった。

I sometimes have a hard time choosing colours for my images when using copics. As you can see here, I made the world bright than I wanted the first time around. So, I just restamped the image and coloured it again. Then cut it out.
たまに作品に合わせてコピック・マーカーの色を選択するのは難しいです。この写真を見たら、最初ぬったイメージはちょっと明るすぎたので、もう一回スタンプして違う色を塗りました。そのあと、クラフトはさみで外側を切りました。


To make sure my new piece is adhered securely, I have chosen to use my mini Xyron. I put the piece in one end. Pull it out the other side and rub on top of the plastic to be sure all the adhesive is stuck. I pull off the clear film and throw it away. Then I adhere my new image in the same place as the old image.
切ったイメージはXyron(ザイロン・シールメーカー)に通す。シールはひっぱりカットして、上から指でしっかりこする。不要な紙にテープをつけ、シールの透明フィルムをはがしてXyronを通したパーツを接着面を上にして固定する。後は最初のイメージにはりつける。


Here is the finished card:
これは完成したカードです:


「あなたは世界をより良い場所をする」


I chose the stamp from My Favorite Things – Vertical Greetings stamp set. I love how this looks!
このスタンプはMy Favorite ThingsのVertical Greetingsスタンプセットを使用しました。

I choose to the sentiment from the same stamp set as the A La Mode girl ‘You Mean the World to Me’. I actually cut the stamp in half.
正面にある女の子と内側にある言葉づかいはMFTのA la mode- You Mean the World to Meスタンプセット。「あなたはかけがえのない人です」の意味を伝えます。本当はこの長い言葉づかいは半分に切って、好きな場所を簡単に置くようにしました。


And here is the inside of the card. I used the negative from the monarch border. Love how it turned out!
これはカードの内側です。正面に使ったボーダーをカットした時、残ってるダイカットの部分がありました。それを使って、中に貼りました。Looks good!


Happy Birthday, Mom!

Products Used: Paper (Papertrey Ink – Aqua Mist; My Favorite Things – Gumdrop Green; My Mind’s Eye, Happier); Dies ( MFT – Monarch Border, Vertical Greetings, Dainty Doily Duo, Leafy Flourish); Stamps (MFT – Vertical Greetings, a la modes You Mean the World to Me); Bling (Wild Orchid Crafts – Aqua Rhinestones); Ink (Tsukineko Memento Tuxedo Black, VersaMagic Turquoise Gem)

トリマーとはさみ

Trimmers and Scissors

It’s important to have the right kind of scissors when crafting.
スクラップブッキングをする時、正しい種類のはさみを持つ事は重要です。

As you can see, I have a few pairs of scissors. The reason why is that they all used for different purposes.
写真で見るように私は数種類のはさみを持っています。さまざまな用途に使い分けます。


Starting from the left, my paper trimmer is used for measuring and cutting paper at the same time. I have this smaller one for cards and smaller projects, as well as a larger one for using 12x12 paper. It’s helpful to have a set of spare blades on hand for when they get dull. If your blade is dull, you won’t get a clean cut. As with your scissors, always use a separate blade for transparencies and chipboard to make your blade last longer.
左側から、私のペーパートリマ―は測りながら紙をまっすぐ切る道具。この小さいトリマーはカードや小さい作品のために使い、大きいトリマーは12インチレイアウト用もあります。刃が鈍るときれいに切れなくなるので、スペアのブレードは常にストックしておく。はさみと一緒で、他のもの(トランスペアレンシーやチップボードなど)を切る時、刃を使い分ければ長く持つようになります。

The first pair of scissors are Kuretake craft scissors. These have a fine tip and are getting to cutting out detailed pieces.
最初のはさみは呉竹(クレタケ)のクラフトはさみです。刃先が鋭いから細かいものはきれいにカットできます。

The second pair are my non-stick scissors. When using double-side tape or cutting things that have adhesive on them already, you will find your scissors getting sticky and the residue can be easily transferred later when cutting paper. Even if your craft scissors say non-stick, I would still keep a separate pair just for adhesives.
二番目のはさみはフッ素加工のはさみです。両面テープやシールなどのべたべたしたものを切るとはさみに接着剤が残って他の紙に移ってしまうので、使い分けは大事です。フッ素加工クラフトはさみは紙だけ用と接着剤用と二つ持つ事をお勧めします。

The next pair are fabric scissors. These are used for material, ribbon, thread or fibers only. The reason is because once your scissors are used on paper, they will become dull and no longer be able to cut fabric or ribbon.
次は生地用はさみです。布、リボン、毛糸、ファイバー(系類)だけに使用します。刃がダメになるので、このはさみで紙を切らないでください。

The last pair of scissors are my catch-all. They can be used for anything really, but mostly I use them for cutting larger pieces of paper. The blades are much longer than the precision-tip ones and the handles are nice big, easy to hold.
最後のはさみは全般に使います。何にでも使っても大丈夫ですが、このはさみは大きい紙をカットします。刃は長く持ち手は大きくて便利で使いやすいです。